This page contain articles for cooking and product reviews.
Cooking – Best Carrot Salad ever
Ingredients
For the salad
- 4 medium carrots grated
- 2 tablespoons raisins
- 2 tablespoons dried cranberries
- 2 tablespoons unsweetened shredded coconut
- 2 tablespoons pecans chopped
- 2 tablespoons walnuts chopped
- 2 tablespoons pumpkin seeds
- 2-3 tablespoons chopped parsley
For the dressing
- 1 tablespoon avocado oil (I use olive oil)
- 1 tablespoon apple cider vinegar
- 1 teaspoon unpasteurized honey
- 1 teaspoon grated fresh gingerroot
- 1/2 teaspoon Dijon mustard
- 1/4 teaspoon salt
- 1/4 teaspoon ground black pepper
Instructions
- Combine all the ingredients for the salad in a large mixing bowl. Set aside
- In a small container or measuring cup, combine the avocado oil, apple cider vinegar, honey, gingerroot, mustard, salt and pepper and whisk vigorously with a fork or flat whisk until well combined and slightly emulsified. Pour over the reserved salad and toss well.
- Transfer to serving bowl and garnish with more pumpkin seeds, chopped parsley and grated coconut, if desired.
- Serve immediately or place in the refrigerator for a couple of hours to allow flavours to meld.
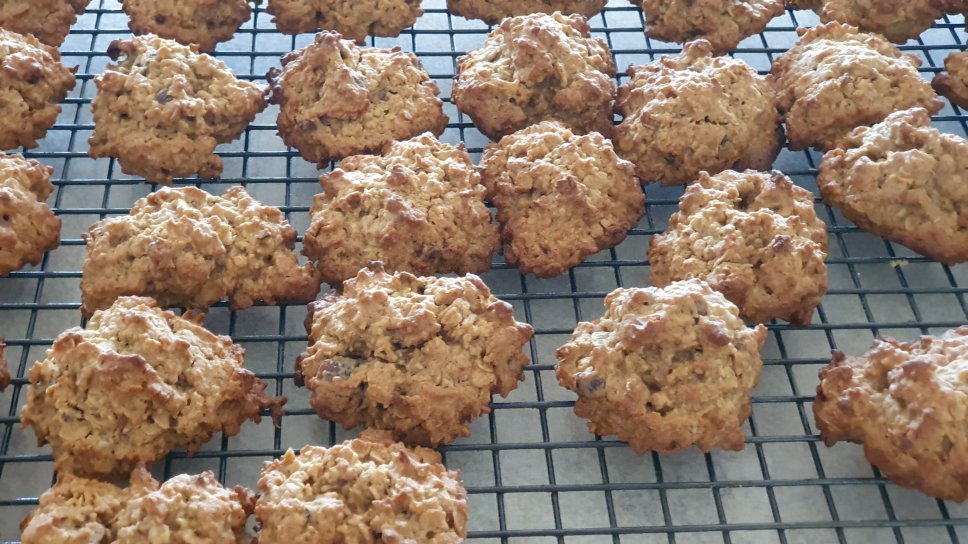
Cooking – Date, Oat and Coffee Cookies
By Kerry
This recipe is a modified version of a Coles catalogue Date and Oat cookie recipe with coffee added. The coffee really adds to the flavour of the cookie. They are the ones we were waving around at the September Club Zoom meeting.
Makes Prep Cooking
40 20 mins 15 mins
Ingredients
- ¾ cup (105g) dried pitted dates, coarsely chopped.
- 3-4 heaped tsp ground plunger coffee in a coffee plunger with ½ cup boiling water*
- ¼ tsp bicarbonate of soda
- 150g butter
- ½ cup (110g) caster sugar
- ½ cup (110g) brown sugar
- 1 egg
- 1 cup (150g) plain flour
- 1 tsp ground cinnamon
- 3 ½ cups (300g) rolled oats (not quick oats as they are too much like flour and absorb too much liquid)
Method
- Preheat over to 180C. Line 2 large baking trays with baking paper. Pour the boiling water over the coffee in a small plunger and leave for 10 minutes.
- Place the date, bicarbonate of soda and plunged coffee in a medium sized heatproof bowl and sit for 10 minutes for the dates to soak up the coffee liquid.
- Meanwhile, using an electric mixer, beat the sugars and butter in a large bowl until pale and creamy. Add the egg and beat until just combined.
- Stir in flour, cinnamon, oats and date mixture. Press tablespoons full of mixture together and place on prepared trays, about 3cm apart.
- Bake for 12 to 15 minutes or until golden. Set aside on trays to cool.
I found the recipe said 12 minutes, but they needed closer to 15 minutes to cook through as I did not flatten them on the trays before cooking. I think if you flatter them out, they will take 12 minutes.
- Instant coffee could be used, but I think it is a bit bitter and not quite as smooth as plunger coffee.
Cooking – No Bake Muesli Slice
- Place in a bowl: 2 cups of rolled oats ; 4 crushed vita brits (or weet-bix) ; ½ cup Sultanas ; ½ cup of chopped nuts
- Combine well
- Note: I make up the cup of sultanas and nuts with whatever I have in the pantry ie cranberries, apricots, choc chip bits (don’t add these till the mixture cools a bit)
- Place in a saucepan: 125gm butter ; ½ cup of honey ( I use less if it is very sweet honey) ; ½ cup crunchy peanut butter ; ½ cup brown sugar (firmly packed)
- Melt together, stirring constantly and simmering for 5 minutes.
- Pour Liquid into dry ingredients and mix well.
- Press into a tray and set in the Fridge.
By Jean
Cooking – One Pop Sweet Potato Pasta
Ingredients:
- 2 tablespoons olive oil
- 2 garlic cloves (finely chopped)
- 1 celery stick (finely chopped)
- 1 carrot (finely chopped)
- 1 brown onion (finely chopped)
- 1 tin (40g) diced tomatoes
- 5 litres of water
- 1 sweet potato (peeled, diced into 1cm cubes/can use pumpkin if desired)
- 1 ½ cups small pasta shapes
- Parmesan and parsley to serve
Method:
- Heat the oil in the camp oven over heat (such as open fire or BBQ)
- Add the garlic, celery, carrot and onion, and cook
- Stir regularly until the onion is soft and translucent
- Add the tomato, water and sweet potatoes to the pot
- Cover and cook until the sweet potatoes are almost tender, about 30 minutes
- Add the pasta and cook for another 10 minutes or until the pasta is al dente
- Remove from heat, season to taste
- Serve in big bowls with the parmesan and parsley
Cooking – Orange Cake
Ingredients:
- 1 orange
- 1 cup self-raising flour (sifted)
- 1/3 cup cocoa (sifted)
- 1 cup castor sugar
- 80g butter (soft)
- ½ cup milk
- 2 eggs (lightly beaten)
Method:
- Cut the top off the orange
- Take the inside out of the orange
- Place the cake mix inside the orange about halfway
- Replace the top of the orange and wrap in tinfoil
- Place the orange on a bed of coals for about 15-20 minutes
- Unwrap the orange to allow it to cool slightly before eating
Cooking – Lemon Drizzle Cake
Developed by Jennifer. Made by Lyn.
Ingredients:
- 125 g unsalted butter (room temperature)
- 1 cup caster sugar 2 eggs (room temperature)
- ½ cup self-raising flour
- ½ cup milk
- 1 large lemon (freshly grated/zested rind
Hot mixture made whilst baking the cake:
- 1/3 cup lemon juice
- ½ cup caster sugar
Instructions:
Remove the cake from the tin, taking off the baking paper carefully. Serve with a dusting of icing sugar (optional)
Preheat the oven to 180 C conventional oven OR 160 C fan forced oven
Grease and line a loaf tin
Using a mixer, cream butter and caster sugar until fluffy
Add the eggs one at a time, mixing in between
Alternate the self-raising flour and milk as you mix
Finally, mix in the lemon rind
Pour the mixture into the prepared tin.
Place in the oven and bake at 180 C conventional oven / 160 C fan forced for 45 – 50 minutes.
Whilst the cake is baking, place a small pot on the stove top with the hot mixture ingredients of lemon and sugar. Heat gently until the sugar has combined with the lemon.
Check on the cake, if you can see it is lifting slightly from the side of the tin, OR test with a cake skewer. The cake is ready if the skewer comes out clean. Lightly pressing the centre of the cake and it springing back is also a good indication of a baked cake.
Remove the baked cake from the oven and while it is still in the tin, immediately pour over the hot mixture of lemon and sugar.
Let it stand in the tin until cold.
Cooking – Life Changing Burnt Cheesecake
Developed first by Dani Valent and adapted by Emma. Made by Lyn.
Ingredients:
4 eggs
500 g cream cheese (chopped into cubes)
70 g caster sugar
225 g thickened cream 20 g plain flour
1 lemon (zested)
Instructions:
- Preheat the oven to 200C without fan forced or 180C with fan forced
- Grease and line a 20 cm spring form tin very well with baking paper. (NOTE: The mixture is quite runny)
- In a food processor, whizz the eggs for a few seconds, and then add the cream cheese and whizz until smooth.
- Add the sugar and again whizz until smooth.
- Add the cream, flour, and lemon zest and give it a final whizz until smooth.
- Pour into the tin and place the tin on a baking tray, as some of the mixture may seep out before setting.
- Bake at 200C °C without fan forced or 180 °C with fan forced for about 1 hour and 15 minutes OR until just set. The centre should have a bit of a wobble.
- Cool in the tin. Carefully remove the tin and the paper. There will sit the most delightful cheesecake you have ever made! Mostly because it is easy to make!
- Serve warm or completely cooled.
Truly life changing!
Cooking – Frankfurts in Damper
Ingredients:
- 2 cups self-raising flour
- 30g butter (chopped)
- 3/4 cup buttermilk
- 6 frankfurts
- 1 egg (lightly beaten)
- Tomato sauce (to serve)
Method:
- Sift flour into a bowl. Using fingertips, rub butter into flour until mixture resembles breadcrumbs. Make a well in the centre.
- Add buttermilk. Using a flat-bladed knife, stir until mixture forms a soft dough, adding more buttermilk if necessary.
- Turn out onto a lightly floured surface. Knead gently until smooth (don’t over-knead).
- Divide dough into 6 equal portions. Roll 1 portion out to a 10cm x 16cm rectangle.
- Push 1 paddle pop stick into the end of each frankfurt.
- Place frankfurt in the centre of dough. Roll dough up to enclose frankfurt. Repeat with remaining dough, paddle pop sticks and frankfurts.
- Place a large, greased cast iron pot over high heat until hot. Brush dough with egg.
- Carefully place in pot. Cover with lid. Reduce heat to low.
- Cook, turning occasionally for 15 minutes or until golden all over.
- Carefully remove from pot.
- Serve with tomato sauce if desired.
Cooking – Chicken Parmesan
An over-the-fire version of classic Chicken Parmesan by Derek Wolf
Prep Time: 15 minutes Cook Time: 15 minutes Servings: 4 people
Ingredients: Chicken Parmesan
- 2 Whole Chicken Breasts boneless & skinless
- 2 tbsp salt, pepper, and garlic
- 1 cup Breadcrumbs
- ½ cup Parmesan Cheese (grated)
- 2 Eggs (whipped)
- ½ cup Flour
- 1 cup Marinara Sauce
- 4 oz Mozzarella Cheese
- 2 tbsp Olive Oil
- Fresh Basil garnish
Ingredients: Pasta
- 16 oz Rigatoni Pasta cooked
- ½ cup Unsalted Butter room temp
- ½ cup Romano Cheese grated
- ½ cup Parmesan Cheese grated
Method: Chicken Parmesan
- Start by pounding chicken breasts to ½” thick.
- Then season generously with salt, pepper and garlic powder
- Dredge each piece in flour, dip in whipped eggs, then coat in a mixture of breadcrumbs and Parmesan.
- Build a medium-high fire (about 350F) with a cast iron skillet.
- Add ½” of olive oil to the skillet to heat up.
- Place breaded chicken in the skillet and cook 3-4 min per side until golden brown and 165F internal. Move to indirect heat if needed to finish cooking.
- Spoon marinara over each chicken breast then top with sliced mozzarella.
- Cover loosely with foil or a skillet lid to melt the cheese.
- Remove from heat once the cheese is melted. Garnish with fresh basil and extra Parmesan.
- Serve with the alfredo pasta on the side and enjoy!
Method: Pasta
- Follow the instructions on your pasta to cook until al dente. Make sure to save 2 oz of pasta water for the sauce. Once the pasta is done, strain and set to the side.
- Add your room temperature butter into the middle of your pasta serving plate/bowl and flatten it. Top with the warm cooked pasta and mix around in the butter. Add your grated romano & parmesan cheese along with 2 oz of your pasta water.
- Mix together until silky and creamy.
Notes
Make Your Own Marinara
The jarred stuff from the supermarket will be just fine for this recipe.
But, if you’ve got extra time and want something extra delicious, you can make your own!
- Heat about a tablespoon of olive oil in a saucepan or skillet over medium-high heat.
- When the oil shimmers, add 3 minced garlic cloves, a pinch of red pepper flakes and 1/2 teaspoon oregano. You could also use a teaspoon of garlic powder if you don’t have the fresh stuff.
- Stir until fragrant, about 30-60 seconds. Then, pour in one 28-ounce can of crushed tomatoes (or whole, peeled tomatoes that you crush by hand before dropping in the pot, if you want to feel like a real Italian nonna). Add in a couple teaspoons kosher salt and let the sauce simmer for about 30 minutes.
- Enjoy with chicken Parmesan or plenty of other delicious pasta!
https://overthefirecooking.com/chicken-parmesan/

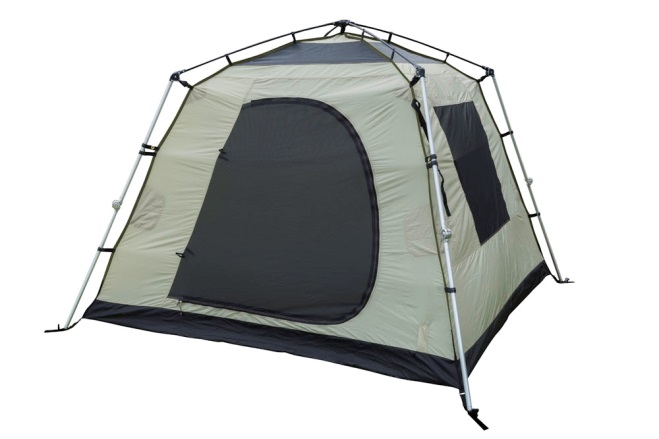
Review – Tent, Black Wolf Turbo 240 X-Lite LF
By Janelle
The purchase of this tent started with me wanting just a little more luxury. What we were looking for in a new tent:
- More floor space
- Room to stand up to get dressed
- A vestibule
- Not too heavy
- The packaged tent needed to fit across the width of the Forester
- Easy to put up
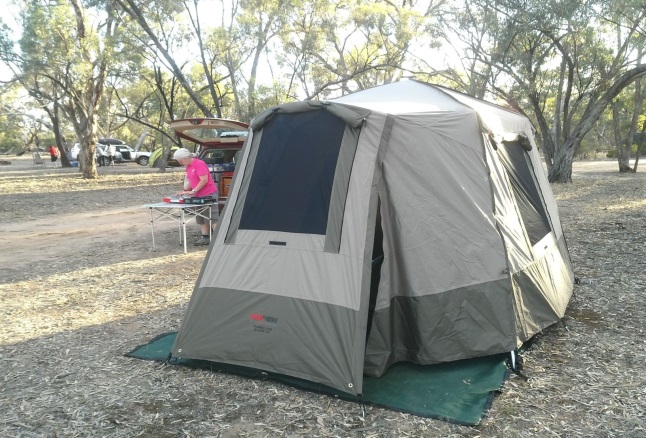
Vital Statistics:
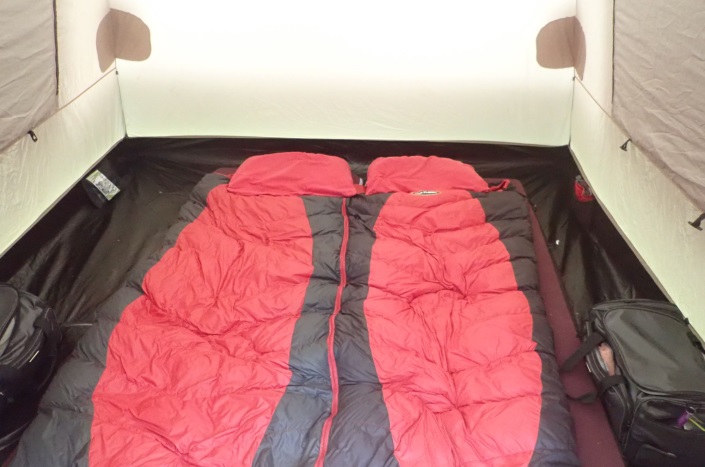
- Sleeps four: so enough room for two adults. There is room for a queen size air bed/mattress with enough space down each side for a small overnight bag and the general untidiness which goes with camping in a tent.
- Sleeping area: stated as 240cm x 240cm – this is a little generous, more like 220cm x 220cm.
- Maximum head height: 210cm. Suits us perfectly.
- Packed dimensions: 120 x 25 x 25cm. These dimensions vary each time we pack it. As is the case for these things it never packs the way it was when it was new.
- It fits across the width of the Forester.
- Made from: the tent inner, fly and floor are all made from some sort of polyester.
- Frame: 23mm Alloy Upright Poles and 12.7mm Composite Roof Poles
- Weight: 14kg
- Warranty: Limited lifetime (whatever that means)
Other features:
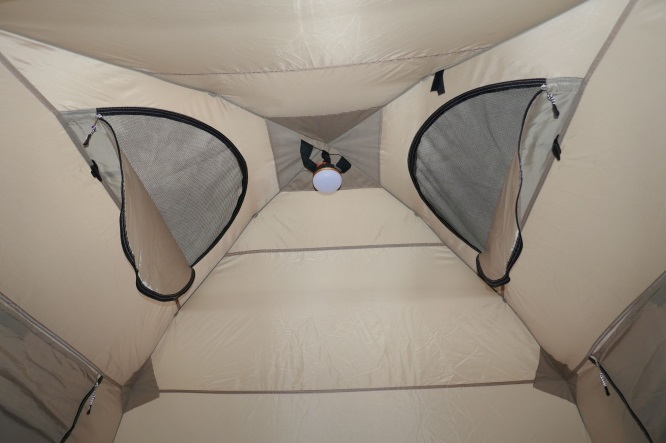
- A loop to hang a light from.
- There are two zippered condensation vents in the roof which seem to work well.
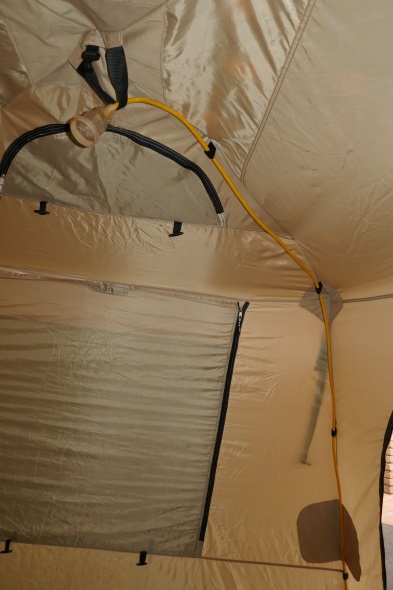
- An opening low down on one side of the tent through which one could run a power cord for lighting or charging of phones.
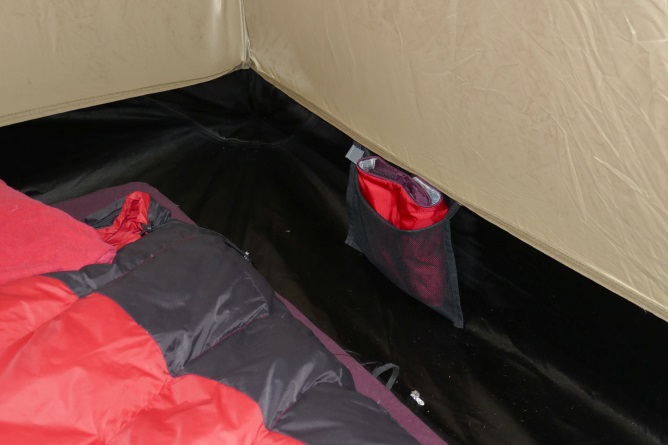
- Low level pockets on each side of the tent in which to store spectacles etc. whilst sleeping.
- There are three zippered pieces to the vestibule. The centre one of these can be extended as an awning. I think poles and pegs are not supplied for this.
- We use one side of the vestibule for entry and exit, away from the weather side.
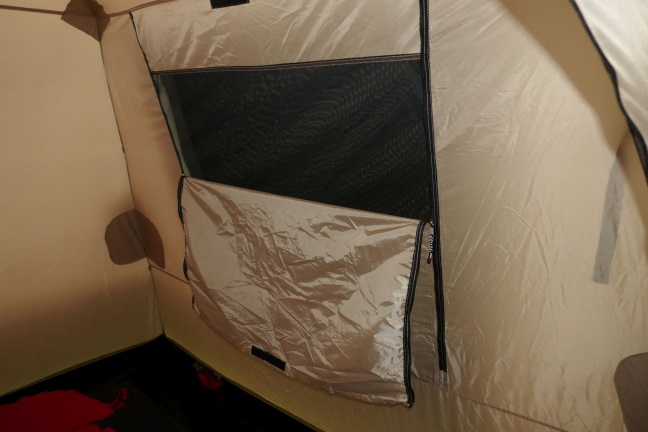
- There are two windows and each has storm flaps on the outside which can be rolled up or pegged out depending on the weather.
Setting Up:
The tent is easy to put up, but does require pegging out square which can involve a bit of adjusting and repegging. (Dale’s job.)
- The inner is permanently attached to the poles.
- Once the tent is pegged at each corner, the poles are straightened and with the top popped it becomes self-standing (barring gale force winds).
- At this stage the fly requires two people to pull it over the top. For a single person you would lay the fly over the top of the tent before erecting it.
- There are two curved aluminium tubes that are threaded through the front of the fly (joining in the middle and attaching to the tent frame) to create the roof of the vestibule. This process is a little fiddly but gets easier with practice.
- Once the fly is velcroed in place, it of course needs to be pegged out.
- There are the normal number of pegs for a tent of this size and it takes as long as it takes.
Packing up:
- A little care is needed pulling on the popped top from the inside. Once that is done, from the outside, bend the poles at the joints and fold the tent material almost as one would an umbrella (it’s a lot messier though). There are two straps to hold all of this in place.
- Fold the fly separately (we all know how easy that is to get neat), place in the bag and hope it all fits.
Our thoughts:
- Good for standing camps. We will continue to use the hiking tent or roof top camper for other trips.
- We would have liked the vestibule to be a little larger but there are always compromises with weight/size and ease of erection.
- We find it easy to erect, probably no quicker than other tents we’ve erected in the past. (Divorce warning – practice putting the tent up at home.
- It does not come with a ground sheet nor is there one available for purchase. This is a pity as it would make getting the tent square a lot easier.
- The walls are relatively vertical which makes standing up easy, but even so one needs to stand on the bed to achieve this, which can be a little unstable.
- The vestibule is high enough for us to stand in which is great for taking off and putting on of shoes etc. There is a small amount of space for storage of folded up chairs etc. and it keeps your boots dry.
Overall:
- We are quite happy with the purchase – $560 from Snowys.
- More low pockets in the tent would be handy for storing phones, glasses etc whilst sleeping. So easy to lose things in a tent.
- I like the feeling of more space and height.
- Despite being a lot bigger than our hike tent it still felt cosy and warm in the Omeo weather.
- It hasn’t been battered by Portland winds as yet but we are hoping it would stand up to such winds at least in a sheltered spot.
Review – Kings Wireless Fridge Thermometer
Review by Kerry
As part of the fit out of the back of the Pajero, Graham has made a box to go over the left hand side wheel arch which we are calling “Mission Control”. It will house the MPPT solar controller, several USB outlets for charging phones, cameras etc., Engel fridge and cigarette lighter connectors, Anderson plugs for 12v out and solar input, fuse box, load meter to measure voltage power in and out and circuit breakers. The auxiliary Lithium battery is now in the 3rd row seat well along with the Ctek DC/DC charger.
We have been using a cheap aquarium thermostat in the fridge as it doesn’t have an inbuilt one. Their longevity isn’t great and it’s difficult to change the battery and maintain a good seal on the unit, so we decided to get a wireless one and mount the screen on the mission control box.
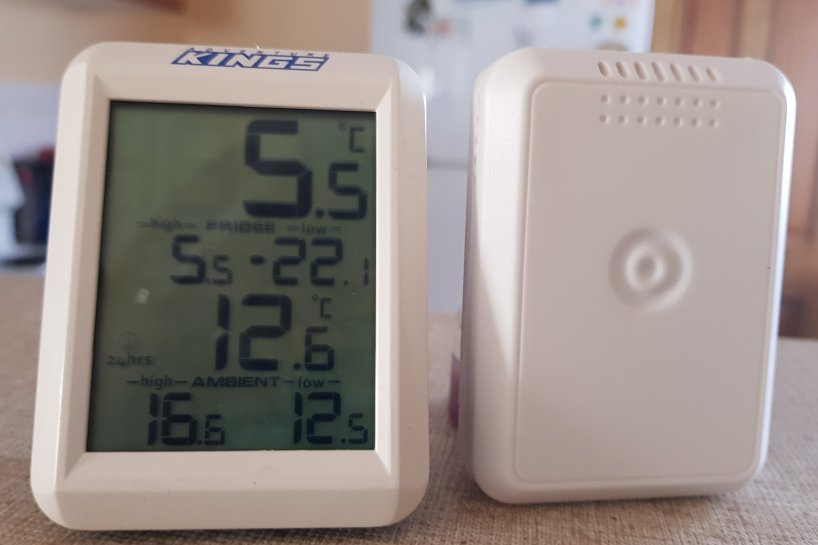
We bought the Kings wireless one from 4WD Supacentre for $25. It has had good reviews so decided to try it. The display screen is 75mm x 58mm and the sender unit a little smaller. Each unit requires 2 x AAA batteries and are supposed to last between 12 and 24 months depending upon the use. I read one review which said he only got 8 months, but given how cheap AAA batteries are, that’s not a problem.
We tested it in both the fridge and freezer against the aquarium thermostat we have (Graham has a few of them around !). It registered quite close to the aquarium one. The only downside is that it can take up to ½ hour to equalize if you have changing temperatures eg. take it from the fridge to the freezer. Once it’s settled, it’s quite happy. It also registers the ambient temperature, as well as the highest and lowest fridge temperature in the last hours. The screen is easy to read and has a fold out stand and a mounting cutout if you want to have it on a nail or similar mount.
All in all, happy with it and the price is cheaper than those available on E-Bay. Delivery is an additional $5.
Review – Tent, Darche Urban 350 with awing wings
By Duncan
Lee and I purchased a new tent, actually it was a birthday present from Lee and the rest of the family, with the view of using it as a tent for standing camps. Our old single pole tent is OK for roaming camps as it is very quick to set up but affords little room to move and the awing flag on the single pole tent offers no real protection against the weather.

After much research the Darche Urban 350 was the pick, good reviews, quality canvas and more room but still reasonably quick to set up. Using just a single internal pole and an external lean pole setup for the back part. We also purchased an A-frame pole set up so that the single centre pole can be removed allowing for even more room. There are only 4 pegs for the main floor, but there are so many ropes that keep the tent grounded along with windows that can be opened for ventilation whist still keeping the rain out along with small flaps lower down the tent for greater air flow if need be.
Measuring 350cm X 260cm we can easily store our clothes and anything else we need to store in the tent. And tall enough to stand up in. With the A-frame pole set up allows for hanging space so if we need to hang anything on coat hangers we can easily do so. Lee now can use a lower more comfortable stretcher (the one she used to use was a lot higher so we could store stuff underneath it…) which also takes up less room in the back of the ute. The awning flaps when attached expand the weather protection to the point where you can bring the kitchen sink and leave it set up…..
Our first outing was on Steve’s trip up to the High Country over the Queen’s Birthday weekend, good trip too, and we had a little bit of rain, we stayed nice and dry along with all the camp gear we left out under the awning and wings, great feature those awning wings, every single pole tent should have them as an option.
Packing up was an easy exercise too, the tent actually went back into the bag without too much trouble even with a damp tent. Darche are clearly not one of those companies that make their tent bags where you need to be a magician to get it back into it, we managed pretty easily and knowing we had to hang the tent under the carport when we got home to dry it, we weren’t particularly careful when folding it up. We need to sort out what to do with the awning wings, they don’t fit in the bag but as they are an accessory you can understand that.
So would I recommend a Darche Urban 350 tent (or even the smaller 260 which you can also fit the awning wings)? Yes I would. Easy to set up, plenty of tie down points for when going away with Mike and Meredith as they always bring the wind on every trip we have been on together, rain too…. Not the cheapest tent out there, not the dearest either but the quality is very good and am very happy with my birthday present. Roll on my standing camp trips.